Although my primary concern with the block sanding was the outer sills, I decided to spray the exterior body shell. There are enough little
imperfections all over to warrant some extra spraying, and I figured that using the guide coat might scare up dimples and such that I
could take care of. I also sprayed the exterior sides of the doors and trunk lid. These also needed work to get rid of minor ripples.
Having a "long board" for wet sanding certainly has helped to get the sills straight. But I have found that the final stages of the process
require that I use a gentler approach to curves, and especially on the curves of the rear quarter panels above the wheel wells. I know
that there are long flexible sanding boards, but I don't have one. Instead, I have used 3/4 inch foam
insulation as a sanding block. It is about twelve inches long, so it doesn't have all the advantages of the long boards, but at this point
it seems to be quite good at smoothing out curved surfaces. I've just had to be more careful about distributing my sanding work across the
surface, so that I don't grind down into any one area.
I have brushed or sprayed a total of five coats of primer on the exterior sections of the body shell. Most of that has ended up sanded off and
suspended in a bucket of water. I have been thinking that the fifth coat would be the last, though the jury is still out on that. Since I want to
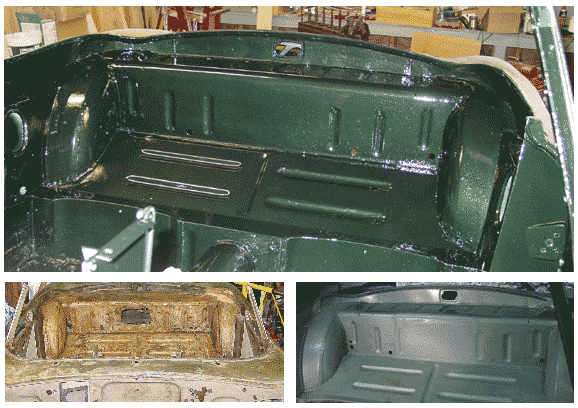
spray color on the exterior before the end of July, I decided to go ahead and paint the less critical sections of the shell: the inside of the
trunk (aka, the "boot"), the gas tank opening, and the interior section of the car.
So, after I applied the latest coat of primer to the exterior and sprayed a "guide" coat, I masked up the entire car. It looked like it was
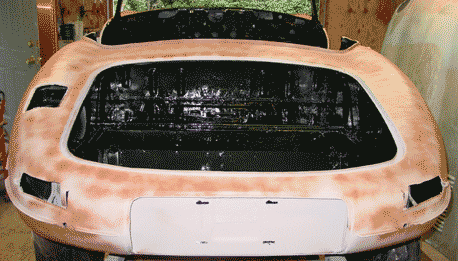 wrapped up for shipment or a rather plain birthday gift.
I decided to spray a sealer before any color. It isn't absolutely necessary, but I ran into a problem with paint not sticking and bubbling up.
That was enough of a pain to go through the precaution of using a sealer. Surface preparation entailed washing the surfaces with clean water to
remove dust and dirt. After that I used a degreaser to remove any residues of grease or oils that might have dropped onto the surfaces. Then it was
a matter of waiting and watching for everything to dry — and no long wait was required, since North Carolina has been hot
lately. I gave it about two hours.
The Dupont sealer I used is three-part: a base, a thinner-activator, and an activator. Pot life for the mixed product is only one hour. I have found
that the stuff is tough to clean off of hands and any surface where it's dried. I was told that the sealer should be allowed to dry, but that painting
over it should take place pretty soon after drying. An overnight dry-time is not appropriate, I was told by some experienced painters. If the sealer
dries overnight, I was told to "scuff it up" before applying color.
After sealer comes the color and then the clearcoat. One thing I've noticed with spraying color over the sealer: you need to be sure not to miss
any places. The dark grey of the sealer masquerades as the opalescent basecoat, even when I've sprayed in very good light. I've decided to spray two or even three coats of base color, methodically
covering all areas. Method is probably the key here — start and end your painting of a section following a plan.
Clearcoat is last. It livens the basecoat.

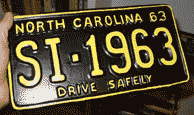 bad about it. I manufactured a completely bogus 1963 North Carolina license plate with some old
Plexiglass, a handful of modelling clay, some plaster of Paris, Bondo (the cheap kind), and some paints found in the garage.
The process was simple: Using the plexiglas as a base, I fashioned the raised letters and numbers with the modelling clay, making
the side bevels a bit more gradual than the eventual product. This allowed for some material for shaping. After applying a bit of
dishwasher soap and water to the Plexiglas and clay plate, I poured plaster of Paris over the plate. This made a mold. After the
mold had set, I applied Bondo to the mold, and embedded a piece of wire screen for strength — an entirely good "blodger" practice.
I had to break the plaster apart to remove it from the Bondo, in spite of the soapy lubricant. Final shaping was with sandpaper.
bad about it. I manufactured a completely bogus 1963 North Carolina license plate with some old
Plexiglass, a handful of modelling clay, some plaster of Paris, Bondo (the cheap kind), and some paints found in the garage.
The process was simple: Using the plexiglas as a base, I fashioned the raised letters and numbers with the modelling clay, making
the side bevels a bit more gradual than the eventual product. This allowed for some material for shaping. After applying a bit of
dishwasher soap and water to the Plexiglas and clay plate, I poured plaster of Paris over the plate. This made a mold. After the
mold had set, I applied Bondo to the mold, and embedded a piece of wire screen for strength — an entirely good "blodger" practice.
I had to break the plaster apart to remove it from the Bondo, in spite of the soapy lubricant. Final shaping was with sandpaper.
